Archiv der Kategorie: software

Bitlocker: „Die Anzahl der zulässigen Versuche ist beschränkt“

Vor einiger Zeit bin ich auf diesen Fehler bei der Eingabe der Pre-Boot-Authentifizierung eines Laptops gestoßen: „Die Anzahl der zulässigen Versuche ist beschränkt“. Nur der Wiederherstellungsschlüssel für die Bitlocker-Laufwerksverschlüsselung half weiter.

Nach weiteren Recherchen im Netz bin ich auf diese Seite gestoßen: https://technet.microsoft.com/de-de/library/dd851452(v=ws.11).aspx

Bei „Understanding TPM Protection Mechanism“ schreibt Microsoft, dass „… Some TPM chips may not store failed attempts over time. Other TPM chips may store every failed attempt indefinitely…“

Es hängt also von den TPM-Modulen ab, die sich die fehlerhaften Anmeldeversuche merken, oder eben nicht. Hier: Fujitsu Lifebook E-Klasse aus ca. 2016, TPM-Hersteller IFX, Herstellerversion 5.51.2098.2, Spezifikation 2.0.

Nicht glaubhaft verifizierte Aussagen im Netz sagten, dass 32 fehlerhafte Anmeldeversuche über die gesamte Lebensdauer obige Meldung erscheinen lassen. Dabei habe ich die Platte entschlüsselt, verschlüsselt, mittlerweile das aktuelle Halbjahresupdate installiert (21H2)… es half nichts: nach einen oder zwei fehlerfreien Anmeldungen der bereits neu verschlüsselten SSD-Platte: obige Meldung.

Microsoft schreibt weiter in diesem Artikel: bitte TPM zurücksetzen.

Achtung: Sichern Sie alle Daten auf dem betroffenen Laufwerk vorab; ich übernehme keine Haftung für entstandene Schäden.

Also los, Start von tmp.msc, dann rechts bei „Aktionen“ TMP löschen; es wird ein Neustart durchgeführt. TPM meldete sich mit einem Wizzard in der Pre-Boot-Phase: „PHYSICAL PRESENCE SCREEN. TPM configuration change was requested to State: Clear. WARNING!!! Clearing erases information stored on the TPM. You will lose all created keys and access to data encrypted by these keys.“ Wizzard bietet YES oder NO an. Ich mache dann YES. Es wird ein nochmaligr Neustart durchgeführt und erstmalig Windows ohne weiteres Zutun angemeldet. Ich unternehme einen nochmaligen Neustart; die Eingabemaske erscheint wieder wie gewphnt.

TPM speichert für die Verschlüsselung mit Bitlocker keine relevanten Daten für die Entschlüsselung. TPM verwirbelt vielmehr mit Algorithmen die zu verschlüsselnden Daten weiter.

Mehrere bewusste Falscheingaben in der Pre-Boot-Phase und diverse Neustarts konnten den Fehler nicht mehr reproduzieren. Bisher hat der Reset des Zählers funktioniert.

installing raspberry: kernel panic 179,2

I just copied a image file of raspbian buster lite to a micro sd card. I used the image program Win32DiskImages under windows 10 64Bit for this job. Not the first time i go on with this stuff, i removed the sd card caddy with the micro sd card from the card reader and put it to the raspberry4. I got following error:

Kernel panic – not syncing: VFS: Unable to mount the root fs on unknown-block (179,2)

No matter with how many Cards you will try this, you could find similar results in the web.(https://www.raspberrypi.org/forums/viewtopic.php?t=12245)

At the end: after writing the image,  removed the card at first via windows function: remove card with icon you can find lower right near the watch/datetime.


Windows 10 on a 8 years old lifebook? yes, it works.

View days ago, a mate gave me a laptop (Fujitsu Lifebook E736) with a windows 7 pro and asked me to remove a malicious program, his virus scanner was the opinion of a infected system. Ok. Done. That was not the matter.

We discussed the situation after February 2020 – windows 7 will not be longer supported by microsoft.

The notebook is (as i mentioned above) a Fujitsu Lifebook E736 with an i3-Processor and 4 GB RAM.  The first look was at Fujitsus Website for drivers. Hm. There just Windows 7 ones for download. So installing and configuring windows 10 on this hardware would be an intressting small project. If all goes right and setup will recognize the hardware, the owner could get a machine for surfing, doing office and multimedia and the laptop goes further as a usefull tool. Lets start.

I have changed the hdd with a Sandisk 670 EVO SSD with 512 GB. Then i downloaded a windows 10 64bit Image from microsoft and installed it via a DVD onto the ssd. During the installation, i choosed the windows 10 home verison (i did not mentioned, how simple was the activation later). The installation was fine, so i downloaded the media creators tool and pushed the current version 1909 on it. Fine. After this i checked the driver via the computer management, and i – astonnished – recognized, that nearly all drivers were found by microsoft native setup installations. Except the card reader is not working.

Windows 10 on a 8 years old laptop - see the desktop
Windows 10 on a 8 years old laptop – see the desktop

The start menue is working very fast, starting the computer management via the start menue takes about 2 seconds. The memory wth a size of 4 GB is about at 50%.

But hows about the actvation? On the lower side of the machine, there is a windows 7 license key sticker. I choosed the activation app of windows, typed in the key and two intresting things happened: first was that microsoft activated with the key the windows 10 and second, it moved from windows 10 home to windows 10 pro.

This action took just view hours on time and the result is very welcome. Now we have a sensfull job for a aged machine with a new windows, for years until maybe the hardware will be unrepairable damaged.

The disadvantage is maybe the battery-power. Batteries of older devices mostly giving power for just few minutes. In this case, we have a such Battery: Plugging off the power cord and few minutes later, the laptop is powered off.

But in the same case, there is no matter. This device works all the time on a desk, power, mouse and keyboard and a external monitor plugged in.

My advice: 1-take a try and install a windows 10 on old machines. Important is the update setup to a current version like 1909 or newer. It might be possibel that on newer devices, you will get a better driver support. So you will have a reliable system for coming jobs like browsing, office, small/medium multimedia, programming, and so on. And you are doing good because you releave the environment. 2-the lifebook E-series is like for office or pro use. If you keep off the next time again and spend a little much more for your device, the change to work longer without problems is better because office and pro devices are builded with a higher quality standard and the driver support is more sustainable.


LineageOS at Samsung Galaxy S7

In this blog I want to descripe my experience to flash a Samsung Galaxy S7 with a LineageOS. Why a old S7? Because you can get a lot of Accessories like bumber cases or armored display protections and the costs are reasonable in relation to technical specifications. And the main reason is that you can get fully developed mods like LineageOS. I’ve had more smartphones in the past e.g. the sony experia Z or the sony experia Z3 – all flashed with cyanogenmod you can compare nowadays to LineageOS. Sony supported in former times a innovative „open device“ program and installed a default recovery image. yes, you lost support but you got a possibility to flash Android without tricky preperations. Please read the computer news for this historical stuff.

I can say that all flash operations with former sony were tricky. No one time was flashing withouth problems. For example on experia Z i installed cyanogen – so far so good – and after this i crypted the internal store. finally, through the encryption, the system was not able to decrypt the file(s)  with provider data. I had a smartphone just only for data connections…  i had to make the decission to use a young and buggy „nightly“ version, that was the solution – and so on!

So i decided to use a samsung s7 for the next years. And because i got a lot of errors the last 2 weeks: here is the progress of flashing and a possible solution that worked for my devices.

Please understand this blog as a part or as addition-blog to the official sites of LineageOS. If you are localized in DACH and can not go on with english sites, just take a translational software like google… (Sollten Sie der engl. Sprache nicht mächtig sein, kopieren Sie den Text einfach in einen Online-Übersetzer wie google…)

I will take no warranty to steps you will do basically at this howto. See it like a additional summary of experience.

Requirements -what do you need?

  • Unboxed Samsung Galaxy S7 type G930F
  • The original USB-Cable of your box (so you can exclude test procedures)
  • Load the battery nearly full to 100% (some devices are just flashable with a high battery status)
  • Put in a large SD card with min 16 GB of size
  • 1 day of free time

First Todos

  • Switch on the S7, step through the starting procedure
  • go to Settings an switch the developer mode on with tabbing at lesat 7 times to the build number in the smartphones properties
  • now you can see the developer mode options in the settings
  • go there to the dev options
  • set OEM dislocking ON, USB Debugging ON
  • shut down the device

What does the common LineageOS say?

At first, go to the official site of LineageOS and read the manual steps. As a summary, you can say that there are three steps. Samsung provides the flashing of there devices. And this is the first step: there is a small part on your smartphone like a bootloader with name „Download mode“. This software package does have no really usable functions but you can start it if you press on the switched off device three keys together: VOL-DOWN, HOME-BUTTON and SWITCH-ON-BUTTON. After seconds you will reach the „Download mode“. Accept the warning and you will see a screen it seems to be waiting for a action from outside the smartphone. You can restart the download mode at every time: just hold the three buttons again and you will see that the device is rebooting – hold further on the buttons and you will land in the same screen again. Easy. But as I say, the „Download mode“ can nothing as download something. Here is the second step: you have to change this part of software with a software with more functions. I have used the flash custom recoery of the TWRP (called: Team WIN)  group.  This custom recovery software does have more functions as the default samsung part. LineageOS does descripe this step with Team Win too. And with the software we reach the third step: change the OS.

First problems – the connection with the device.

My first problem startet with step 1: to transfer the custom recovery flash to the waiting device was not doable. The LineageOS manual said: use the haimdall-Suite to install driver and transfer the image. Installing the driver should be possible with another software programm called zadiag.exe which is a part of the heimdall suite. In summary, that was the problem. The manual said: as a driver use the samsung usb composite device and if you will not find this one, try the gadged serial device in zadiag  to install the driver. For my part i took the gadged serial one because there was no stuff like samsung… After installing the driver, you can simple test the connection with the command heimdall device for detecting and then heimdall print-pit   to download the device specificatio (by the way: just use the –verbose parameter to ge a more detailed log). I got this errors and warnings: „ERROR: Failed to access device. libusb error -12“, „WARNING: Control transfer #1 failed -1“, „ERROR: libusb error -7 whilst receiving packet -7“. With the -7 error it came: „ERROR: Failed to receive PIT file size!“ and „ERROR: Failed to download PIT file!“. In my environment worked the libusb0-driver with the „best“ results: the s7 was detectable but print-pit said 6 warnings with control transfer failed. The other 2 drivers stopped working at „initializing“ status. I have tried more days and many hours to go find a solution. I have tried a virtualbox with a old windows xp and a windows 7 32bit and of course a windows 10 64bit, too. I read a lot of internet articles about thes three errors: -7, -1, -12. Many others had same problems but no finally solutions. The advices hang around: Change the cable, try to reboot several times, load up the battery. At the end, i did a really complex-structured trial-and-test day just find a solution. My opinion now go around the operating system. The main problem is: the device is findably with the „device“ parameter but you can get no transfer-connection the it. probably it should work if you have physical windows 7 with 32 bit with unlocked driver signature surveillance.

The solution – change the transfer software

In my case, through reading many sites i find the TWRP group. As i mentioned above, they developed a custom recovery suite to change the default of samsung and replace it with a more functional flash part. TWRP just not only give the image, they developed a transfer software called ODIN (like heimdall), too. I have downloaded the ODIN 3.12.3 and started it and plugged in the AP-Box the TWRP-Tar-Image file (you can find it here – btw: „herolte“ means the S7, like a developement project name)

thomas-zehrer-de_ODIN-Transfer-Herolte-TWRP-Image

As i said, the phone was with the default image in waiting status. Then START and without problems, i transfered the image to the smartphone. SIMPLE. READY. NO PROBLEMS! Why? The connection should be realized through the former installed Samsung Composite Drivers.

First Restart

After this, i restarted the device by holidng VOL-UP, HOME-BUTTON and SWITCH-ON-BUTTON and got to the new Image of TWRP. Here you can see a screenshot from ther HP.thomas-zehrer-de_twrp-software-image

There are a lot of functions to do. At first, you should make a backup with go to Backup-Tab and swipe a backup to the external card. Takes about 2 hours. At second, wipe the complete storage with Wipe and Advanced Wipe.  Choose “Davlik Cache”, “System , Data”, “Cache”, “Android Secure” and swipe the wipe button. Takes about 10 minutes. Now, you can start your phone in default Waiting Mode with VOL-DOWN + POWER + HOME and in the new TWRP recovery Image with VOL-UP + POWER + HOME. From here you can later start some nice features: backup a complete image, go to the encrypted store, copy files… – all possible with adb.

Last step: Transfer the LineageOS to the phone.

Go to Advanced and set the device to listening mode again. Its called sideload. With the sideload mode you can transfer from your pc or laptop a file for installing to the device, similar a waiting status. Now you need on the windows side a Android well knows software called „android debugging bridge“ or adb. Just download this part from google site and start the command line like this: adb sideload LineageOD.zip – you can see the transmission from windows to the S7 on booth sides. After this go to to restart and restart the device. The new Image will be rolled out.

Summary

Finally, it worked for me. You need a sum of software and todos, i try to list it. so i did not use the heimdall suite. (the links are working at Jan, 19, if you need the files: just contact me).

  • At first the Samsung Composite Drivers from here and install this ones at your windows system.
  • Then create a directory and download following files:
    • The herolte Image: the alternative custom image of TWRP as a tar-File
    • The ODIN-Software to transfer the herolte image-tar-File
    • The ADB Suite (called android plattform tools) for transfering the LineageOS to the device and unpack it.
    • The LineageOS package from the website and copy it in the same directory as the adb.

Then set your phone in listen mode, start ODIN, choose in AP-box the tar-file and send it. Then restart phone holding three buttons VOL-UP_POWER_HOME and the TWRP recovery is starting. Do a backup of your current system, format / wipe the storage and set the device in sideload mode. Do in your windows the adb sideload command and transfer the image to the device.

So flashing a device can make a lot of fun because you learn a lot of your device. What could be the next steps after flashing? Crypting the storage, loading apps from f-droid. You have a unbounded fresh Android with no needless apps you never use or need.

Have a nice day.

Android Develpoment Studio 3.2, AVD: ERROR: x86 emulation currently requires hardware acceleration

Today, i fixed following error by getting an AVD under Android Develpoment Studio 3.2 (latest in Sept. 2018): „ERROR: x86 emulation currently requires hardware acceleration“. In this case i tried to change my AVDs from arm to intelx86 virtual CPU. The reason was a new development environment by changeing from AMD Phenom to an i7.

So I setted up the new dev environment, installed latest updates to 3.2 and configured like many times the new AVDs with some API-levels from 19 to 28 with intels x86 support. Yes, I enabled the hardware virtualization option in the BIOS of my laptop… but starting the new AVD the event log console in the android studio said that „ERROR: x86 emulation currently requires hardware acceleration“ – nothing more.

At first i took a look to the android sdk manager. but during installation, i have already activated the HAXM which can accelerate the x86 emulators by hardware.

thomas-zehrer-de_blog_haxm-android-studio1

thomas-zehrer-de_blog_haxm-android-studio2

The solution at the end was following step i found in the web:  By cmd.exe go to:

C:\users\%youruser%\AppData\Local\Android\sdk\extras\intel\Hardware_Accelerated_Execution_Manager\

and start the executable intelhaxm-android.exe.

After this, a tiny installer installes the haxm module.  Then I restarted android studio again. That was the solution! wow.

In former times, my experience was that the emulators were quite slow in starting and executing commands. But now i have a powerful and fast environment to go on with some emulators at the same time. Enjoy it!

Virtuelle Maschinen für spezielle Aufgaben? Achtung: Langzeitgedächtnis!

Möchte man Aufgaben auf dem privaten PC trennen, so bieten sich virtuelle Maschinen unter VirtualBox oder vmware an. Es ist also möglich, dass für das Surfen im Web mehrere virtuelle Maschinen erstellt werden oder für Einzelaufgaben – z.B. Homebanking mit HBCI, die Facharbeit, Softwareentwicklung, Multimedia – verschiedene virtuelle Systeme in Betrieb genommen werden. Sicherlich gibt es für Laien einige Hürden zu Meistern: welches System soll verwendet werden? Auch Patches, Updates und nicht zuletzt die Sicherung der angefallenen Daten müssen durchdacht sein. Aber funktioniert das Biotop so hat man getrennte Systeme für spezielle Aufgaben.

Die Vorteile, die sich daraus ergeben: Am Internetzugang können die Daten einzelner Maschinen aufgrund z.B. der IP-Adresse unterschieden werden und geblockt werden: Die Perimeterserver von Microsoft dürfen nicht kontaktiert werden oder nur Webdaten Port HTTP/HTTPS dürfen passieren. Dann können die Maschinen einfach gesichert werden: Backup-Festplatte einschalten bzw. NAS verbinden und Files regelmäßig kopieren. Zudem können die virtuellen Maschinen auf Basis des Betriebssystems verschlüsselt werden. Linux bietet hier dm-crypt und für Windows gibt es VeraCrypt oder Bitlocker. So kann auch ein Transport über USB erfolgen. Es könnte der komplette Container mit samt virtuellen Festplatten in einem Archiv mit Kennwort gesichert werden – als Transportsicherung. Das Starten und Stoppen der Systeme dauert auf aktueller Hardware nur Sekunden. Letztlich verteilt man Sicherheit und das lokale, pyhsikalische System dient im Allgemeinen als Host. Trotz der vielen Vorteile muss das Langzeitgedächtnis virtueller Maschinen beachtet werden.

Virtuelle Maschinen unter VirtualBox

Wir legen uns also für verschiedene Aufgaben mehrer virtuelle Machinen an. Angenommen eine Maschine dient nur zum Surfen im Internet. Ein Linux-System wie Debian und Firefox reichen hier völlig aus.

thomas-zehrer_vbox_01Bild: VirtualBox mit mehreren virt. Maschinen

Mit der Virtualisierungssoftware VirtualBox kann das System nach wenigen Minuten betriebsbereit hergestellt werden. Dabei ist auch ein Webclient: surfen, Multimedia, youtube, AddOns – alles sofort verfügbar.

Achtung: Langzeitgedächtnis!

Wie steht es jetzt um die Sicherheit der Daten in dieser Maschine? Ein Test zeigt Potential zur Vorsicht! Startet man die Maschine, z.B. surfing und gibt im dortigen Firefox Zeichen ein, so versucht der Client denServer:

thomas-zehrer_vbox_03

Bild: VirtualBox und Firefox: Zugriff auf Server

Das klappt nicht da es die Adresse thomas-zehrer.de zwar gibt, jedoch nicht den Teil der URL trallalla – aber egal an dieser Stelle. Beendet man die Maschine durch Ruhezustand oder einen Shutdown und untersucht selbige in einem Hex-Editor (ich verwende den kostenlosen HxD von Mael Hoerz da dieser auch mit sehr großen Dateien umgehen kann) so kommen genau die eingegebenen Daten zum Vorschein:

thomas-zehrer_vbox_04

Bild: Die virt. Festplatte im HexEditor HxD

Die virtuelle Maschine hat also ein Gedächtnis. Exkurs: Funktioniert das auch mit Dateien? Extrapoliert man das Verhalten, so bekommt man einen guten Überblick über die Filehistorie: So könnte man mit OpenOffice eine test.docx erstellen und auf dem Desktop ablegen: Informationen dafür im HxD:

thomas-zehrer_vbox_05

Nach dem Löschen in den Trash: Informationen dafür im HxD:

thomas-zehrer_vbox_06

Nach dem Löschen aus dem Trash: Daten persistent:

thomas-zehrer_vbox_07

Nochmals Achtung: Daten persistent!

Verschiedene Tests mit den Daten im Client ergeben: Datei und Daten im Binärfile bleiben bestehen! Am Beispiel der Browserhistorie: Löschen der Browserhistorie mit samt Cookies, Reboot der Maschine, Update Client: nach allen Standardaktionen konnten die Daten nach einem Shutdown im Binärfile weiter festgestellt werden!

Abhilfe schaffen.

Abgesehend davon, dass bestimmte Daten mit besonderer Vorsicht zu behandeln sind (Patientendaten, Daten zu Krankheiten, religiöse Zugehörigkeiten, politische Meinungen) stellt sich die Frage, wie obiges Risiko minimiert werden kann? Gegen wen oder was sollen die Daten geschützt werden? Offensichtlich gegen physikalischen Zugriff auf die Maschinendaten oder eine Software „Schädling“, der über ein Speicherabbild Daten Dritten zur Verfügung stellt. Speicherabbild-Dateien werden während der Laufzeit erzeugt und geben ein Snapshot des laufenden Systems wieder – vergleichbar mit dem physikalischem File. Die Speicherabbilder können über den Taskmanager in Windows erzeugt werden.

Zunächst sollte der physikalische Zugriff auf das Host-System durch Verschlüsselung beschränkt werden. Wie oben angemerkt könnte das VeraCrypt oder dm-crypt sein. Dann sollten die virtuellen Maschinen ebenfalls durch Verschlüsselung abgesichert werden. Verschlüsselt man die hdd-Container unter dem virt. Linux bei der Installation mit dm-crypt bzw. Windows mit VeraCrypt so können diese Offline nicht mehr analysiert werden.

Es bleiben noch die Snapshots wenn das System lediglich in den Ruhezustand gefahren wird: Systeme dürfen nicht mehr in den Energiesparmodus oder den Ruhezustand versetzt werden. Die daraus folgenden Files sind wiederum lesbar! Werden trotzdem Dateien um das virtuelle System herum erstellt, so müssen diese über einen Eraser-Task regelmäßig geshreddert werden. Am Ende müssen lange Kennwörter vergeben werden. Es ist mittlerweile der Standard, sog. secret phrases zu setzen, d.h. unheimlich lange Passwörter, meist Wörter aneinander gereiht mit Sonderzeichen und Ziffern. Das gilt für die Verschlüsselung ebenso wie für das Userkonto in der virtuellen Maschine.

Als oberstes Gebot steht die Erstellung eines Backups: wenn die virtuelle Maschine beschädigt wird, sind die Daten weg. Und sind die Host-Festplatten oder die virtuellen Datenträger verschlüsselt, so kann man mit hoher Wahrscheinlichkeit die Daten schlicht abschreiben.

Dragon zickt nach hard-Reset

Einen merkwürdigen (daher der Blogeintrag) Fehler besonderer Art hatte ich kürzlich, als ich mit der Spracherkennungssoftware Dragon  NaturallySpeaking zu tun hatte.

Hintergrund

Dragon (hier Version 13) wird auf dem Windows-System installiert. Die Spracheerkennung läuft komplett lokal ab – Vorteil. Keine Cloud, kein Internet, keine Bandbreite, praktisch keine Wartezeit bei aktuellen Systemen. Es gibt sogar eine App für Smartphones, die per Bluetooth eine Verbindung zu PC-Installationen herstellen können um darüber Texte diktieren zu können. Dragon lernt mit der Zeit den Sprecher kennen, so dass Dialekte und Sprechattribute laut/leise, schnell/langsam angepasst werden. Dragon läuft permanent auf dem System im Hintergrund – einfach und effektiv. Funktioniert prima! Dragon kann ich für Vielschreiber und Diktier-Freaks empfehlen. Auch elektronische Diktate in mehreren Formaten kann Dragon verarbeiten und in Text umwandeln. Von Vorteil ist, wenn der Sprecher Dragon seit längerem nutzt und trainiert hat. Die Ergebnisse sind um ein Vielfaches besser als nach einer frischen Neuinstallation.

Problem

Problem war, dass das Notebook  mit Dragon schlicht ausgeschaltet wurde – kein sauberer Abschluß durch Herunterfahren oder Standby bzw. Ruhezustand. Ein hartes Ausschalten war Fakt. Es könnte genauso gut ein Absturz gewesen sein. Nach dem Neustart muss man bei Dragon ein Profil öffnen. Das Profil beinhaltet alle Eigenschaften des Sprechers. Es gab folgende Fehlermeldung: „Auf das von Ihnen gewählte Benutzerprofil kann nicht zugegriffen werden. Sie haben eventuell keine ausreichenden Zugriffsrechte, oder die Daeien werden von einem anderen Programm verwendet.“

thomas-zehrer-de_dragon01

Bild: die Fehlermeldung nach dem Hard-Turnoff (bzw. Absturz)

Dragon Fehler-Text: Auf das von ihnen gewählte Benutzerprofil kann nicht zugegriffen werden. Sie haben eventuell keine ausreichenden Zugriffsrechte, oder die Dateien werden von einem anderen Programm verwendet.

Ansätze

Es gab also Dateien, die noch im geöffneten Zustand verharrten. Die Rechte waren in Ordnung, daran konnte es nicht liegen. Neustart von Windows war eine Idee um einen nachträglichen sauberen Abschluß gewährleisten zu können – auch vergebens. Neu-installation der Dragon-Software schuf ebenfalls keine Abhilfe.

Profil finden und Backup prüfen

In Windows liegt das Profil per Standard in C:\ProgramData\Nuance\NaturallySpeaking13\Users. Hier liegen 1:1 die Profile unter dem in Dragon angegebenen Profilnamen. Es bietet sich an, vor Reparaturarbeiten eine Kopie der Verzeichnisse anzufertigen, Strg+C & Strg+V bzw auf USB-Laufwerke. Wurde über Dragon ein Backup angefertigt, liegt dieses unter <profilname>\backup. Doch auch das manuelle Zurückkopieren des Backup-Ordners in das Verzeichnis <profilname>\current half nichts – Achtung: das Backup half an dieser Stelle nicht weiter!

thomas-zehrer-de_dragon02

Bild: die Fehlermeldung nach dem Hard-Turnoff (bzw. Absturz)

Lösung

Nach einigem Probieren und Hin- und Herkopieren war die Lösung folgendes: Neues Profil anlegen und aus dem neuen Profil den Inhalt des Ordners <neuer profilname>\chkpt kopieren in den Ordner <profilname>\chkpt – also den Inhalt der chkpt-Files tauschen UND den backup-Ordner zurückkopieren in \current – das war die Lösung an dieser Stelle. Laut Dragon befinden sich Zeitpunkt-Sicherungsdaten des aktuellen Profils in diesem Ordner. Die Ordnerdaten der Ordner in chkpt waren bereits einige Tage alt, können daher keine live-Daten sein, zudem befinden sich im backup-Ordner die Dateien des current-Verzeichnisses. Daher gehe ich davon aus, dass die live-Daten im current-Verzeichnis gesichert sind.

Stets mit Backup arbeiten

Die Lösung hatte ca. 1,5 Stunden an Arbeiten gekostet. Ich kann an dieser Stelle nur empfehlen, regelmäßig ein Backup des kompletten User-Profils anzufertigen.

Ansonsten ist Dragon eine gute Software.


Top 3 Australian Online Casinos

For the top 3 Australian online casinos, prioritize sites with a wide game selection including slots, blackjack, and roulette. Seek ones offering progressive jackpots for big wins, live dealers for excitement, and social gaming options. Look for generous bonuses like welcome offers, reload bonuses, free spins, and cashback. Guarantee a secure gaming environment with fair play, encryption, player protection, and valid licenses. Transparent terms and reliable customer support are essential. Choosing casinos based on these factors guarantees an excellent online gaming experience with an array of benefits.

Key Takeaways

  • Wide variety of games including slots, blackjack, and roulette with progressive jackpots for big wins.
  • Generous bonuses like welcome offers, reload bonuses, free spins, and cashback rewards.
  • Secure and trustworthy gaming environment with fair play, player protection, encryption, and valid licenses.
  • Live dealer games for real-time interaction, catering to solo players and social gamers.
  • VIP programs and loyalty schemes for continued play rewards and perks.

Game Selection and Variety

When exploring Australian online casinos, you’ll find a wide variety of games to choose from, ensuring an engaging and exciting gaming experience. These casinos offer popular games like slots, blackjack, roulette, and more. One thrilling aspect you may come across is progressive jackpots. These jackpots increase in value as more players participate, offering the opportunity to win big with a single spin or hand.

Another enticing aspect of Australian online casinos is the option to play with live dealers. This feature brings the excitement of a real casino to your screen, allowing you to interact with professional dealers and other players in real-time. Whether you prefer the convenience of playing on your own or the social aspect of live games, Australian online casinos cater to all preferences.

With a diverse selection of games, the opportunity to win progressive jackpots, and the option to play with live dealers, Australian online casinos provide a dynamic and immersive gaming experience for players of all levels.

Generous Bonuses and Promotions

Discover the array of generous bonuses and promotions available at Australian online casinos to improve your gaming experience and increase your chances of winning. When investigating the online casino landscape in Australia, you’ll come across various enticing offers designed to enrich your gameplay.

  • Welcome Bonuses: Australian online casinos often provide generous welcome bonuses to new players, giving you a head start on your gaming journey.
  • Reload Bonuses: Many casinos offer reload bonuses to existing players, providing additional funds when you make subsequent deposits.
  • Free Spins: Enjoy free spins on popular pokies as part of promotional offers, increasing your chances of hitting a big win.
  • Cashback Offers: Some casinos provide cashback offers, giving you a percentage of your losses back to keep you in the game.
  • VIP Programs: Investigate exclusive VIP programs and loyalty schemes that reward you for your continued play with additional bonuses and perks.

When assessing these bonuses, be sure to check the wagering requirements and investigate loyalty programs to make the most of your online casino experience.

Secure and Trustworthy Gaming Environment

Maintaining a secure and trustworthy gaming environment is crucial when participating in online casino activities. When selecting an Australian online casino, look for platforms that prioritize fair play and player protection. Fair play guarantees that the games aren’t rigged and operate based on random outcomes, providing a level playing field for all participants.

Additionally, player protection measures ensure that your personal and financial information is kept safe from any potential security breaches.

Reputable online casinos in Australia implement advanced encryption technology to safeguard your data and transactions. They also hold valid gaming licenses issued by regulatory authorities, ensuring that they adhere to strict standards of operation and are regularly audited for compliance.

Transparent terms and conditions, responsible gaming practices, and reliable customer support further contribute to a secure and trustworthy gaming environment.

Frequently Asked Questions

Are There Any Exclusive VIP Programs Available at These Online Casinos?

When you investigate these online casinos, you’ll find exclusive rewards and elite VIP perks. Loyalty programs offer benefits like personalized support, faster withdrawals, and special bonuses. Immerse yourself in the VIP experience for top-tier treatment.

Can I Use Cryptocurrencies Like Bitcoin for Transactions on These Platforms?

Yes, you can use cryptocurrencies like Bitcoin for transactions on these platforms. Cryptocurrency acceptance provides secure transactions. Your financial information remains protected, ensuring safe and efficient processing of deposits and withdrawals on these online casinos.

Do These Casinos Offer 24/7 Customer Support for Any Issues or Queries?

Yes, these casinos provide 24/7 customer support to assist with any issues or queries you may have. They also offer various payment options, including cryptocurrencies like Bitcoin, for convenient transactions.

Is There a Mobile App Available for Easy Access to the Casino Games?

Yes, there is a mobile app available for easy access to the casino games. The app compatibility guarantees a seamless mobile gaming experience, allowing you to enjoy your favorite games on the go. Stay entertained wherever you are.

Are There Any Restrictions on Players From Specific Regions or Countries?

When playing online, you might encounter regional restrictions based on where you live. Different countries have regulations that determine player eligibility. It’s essential to check if international players are allowed to participate in the casino.

Conclusion

To sum up, the top 3 Australian online casinos offer a wide selection of games, attractive bonuses, and a secure gaming environment. Players can enjoy a variety of options and promotions while feeling confident in the safety of their personal information.

With excellent security measures in place, these casinos prioritize player protection and provide a trustworthy platform for online gaming. Consider exploring these top choices for a reliable and enjoyable online casino experience.

Software Engineering Ariane 5

Im Zuge einer Vorlesung im Fach Software Engineering an der HS Trier im Februar 2015 wurden in einigen Nebensätzen sozusagen prominente Fälle gescheiterter Projekte mit softwarelastigem Hintergrund besprochen.

Aufgrund technischem Interesse an Luft- und Raumfahrt ist mir der erwähnte Vorfall der Ariane 5 besonders nachhaltig in Erinnerung geblieben, der sich Mitte der 90er Jahre ereignet hat.

Was war geschehen? Das neuentwickelte Trägersystem „Ariane 5“ Startnummer V88 hob am 04. Juni 1996 um 12:34 Uhr GMT mit 1 Stunde Verzögerung zum ersten Mal vom Weltraumbahnhof Kuorou in französisch Guayana ab. Nach ca. 40 Sekunden explodierte das System. Außer einem Sachschaden in mehrstelliger Millionenhöhe wurden die vier an Bord transportierten Sateliten zerstört – also Know-How und Entwicklungsarbeit vernichtet – aber es gab keine menschlichen Opfer zu beklagen. Der Vorfall überwarf den Plan um über 3 Jahre in die Zukunft. Ein Testflug im Oktober 1997 fand nur mit Satelitenattrapen und dem von Studenten aus über 10 Ländern entwickelten YES-Sateliten statt. Der erste kommerzielle Flug fand 3 Jahre später statt. Die vier ursprünglichen Sateliten wurden vier Jahre (!) später von russischen Systemen in die Erdumlaufbahn befördert.

Hintergrund zum Trägersystem

Das Vorgänger-Trägersystem Ariane 4 wurde von 1982 bis 1988 entwickelt, d.h. die Entwicklungszeit nahm 6 Jahre (!) in Anspruch. Das System Ariane 5 wurde in 1988 zur Entwicklung freigegeben und im Jahre 1996 fertig gestellt – ein Jahr nach Plan, da der Erstflug bereits im Oktober 1995 hätte stattfinden sollen. Nur um es zu verdeutlichen: die Entwicklungszeit dieses Systems dauerte 8 Jahre! Betrachtet man diesen langen Zeitraum (in dieser Branche eine Ewigkeit) aus Sicht der Projektphasen Anforderung, Analyse, Entwicklung, Bau und Test möglicher Komponenten UND den Umstand, dass damals vermutlich das Verhältnis 50/50 oder 60/40 von Entwicklung zu Test einherging UND die Schwierigkeit dass ein einziges für dieses Großprojekt gegründete französische Unternehmen eine Vielzahl von Zulieferern organisieren musste sowie den kompletten technischen und wirtschaftlichen Part zu verantworten hatte, so werden 8 Jahre schlicht kurz. Dazu kommt, dass ein solch komplexes System nicht vollständig getestet werden kann. Es gab den Erstflug und der führte zu einem Fehlstart. Fertig.

Operanden-Fehler verursachte fehlerhafte Flugdaten

Die Flugdaten des Trägheitsnavigationssystems (auch „inertiales Navigationssystem“ genannt, inertial von lat. iner=träge) lieferten dem Hauptcomputer Daten, die an das Steuersystem weitergegeben und verarbeitet wurden. Genau genommen arbeitete alles gemäß der Softwareprogrammierung.

Hier eine vereinfachte Darstellung des Systems.

thomas-zehrer-de_sri-ocs-sensoren

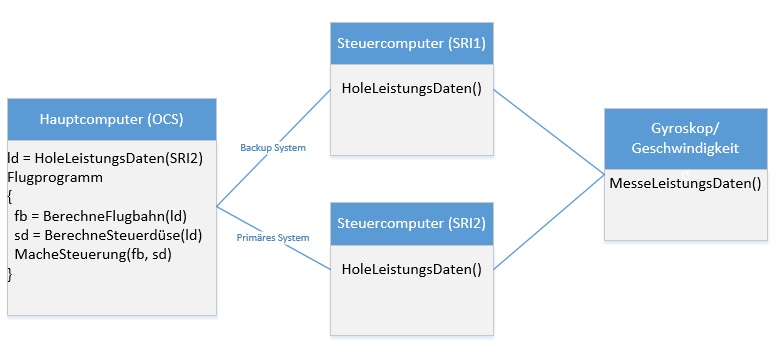
Abb: einfaches UML über Abhängigkeiten OCS, SRI und Sensoren.

Der Hauptcomputer (OCS, Onboard Computer System) hat also zwei Navigationssysteme zur Verfügung. Das aktive SRI2 (Inertial Reference System, Trägeheits-Navigationssystem) hat die Aufgabe, über Gyroskope und Geschwindigkeitsmesser – also Sensoren, die an der Trägerrakete angebracht wurden – Navigationsdaten an den Hauptcomputer weiterzugeben, der diese Daten zur Berechnung und Anpassung der Flugbahn benötigt. Das im Hot-Standby befindliche Backupsystem SRI1 war als redundantes Hardwaresystem auch mit indentischer Software ausgestattet.

E_BH verursachte den Fehler

Der Code für das Trägheits-Navigationssystem SRI wurde der Ariane 4 entnommen. Eine nach der Bergung der Überreste gegründete Expertenkommission fand nach 4 Wochen den eigentlichen Fehler.

thomas-zehrer-de_ada-code-ariane5

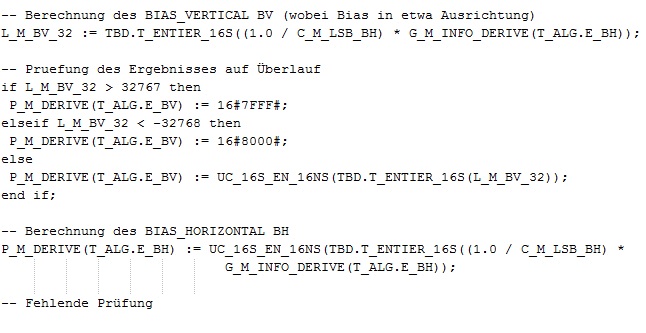
Abb: Quellcode Programmiersprache ADA

Vereinfacht kann die Zeile so abgebildet werden:

PM_DERIVE(T_ALG.E_BH) =UC_16S_EN_16NS(E_ENTIER_16S ( (1 / C_M_LSB_BH) * G_M_INFO_DERIVE(T_ALG.E_BH))

Mich würde brennend interessieren, was UC_16S_EN_16NS genau macht. Versucht die Funktion eine Konvertierung von 16S signed in EN 16 NS nonsigned oder kann diese beide Arten Signed und Unsigned verarbeiten? Dann vermute ich hinter der C_M_LSB_BH eine Konstante sowbei die Variable LSB ein Kürzel für „Large Super Booster“ – die Flüssiggas-Tanks mit Brenner – sein kann. Sicher ist, dass E_BH in die Berechnung ständig einfließt, siehe rechten Term, hinten. Es heisst auch, dass der E_BH aus 64-bittigen floating-Werten berechnet wird. Das kann dann nur die C_M_LSB_BH oder der Multiplikant G_M_INFO_DERIVE (kann G_M etwas mit Gyro-Blabla, also der Wert der Sensorenphalanx sein?) sein. Trotz mehrere Suchen im Internet fand ich hierzu nichts bedeutendes.

Der Wert für die horizontale Ausrichtung (BH, horizontal bias) war aufgrund der technischen Eigenschaften der Ariane 5 (u.a. höhere Schubkraft, höhere Horizontal- und Vertikalgeschwindigkeit) ab einem Zeitpunkt X höher als die Werte der Ariane 4.

Der fehlerhafte Wert in E_BH sorgte also für einen Absturz der Software im SRI2, lieferte vorher aber ein Fehlerwertmuster an den Hauptcomputer. Das in hotstandby befindliche SRI1 war wenige Millisekunden voher bereits down – aufgrund des gleichen Fehlers. Btw: hotstandby heißt in diesem Fall, dass eigentlich zwei Systeme ständig arbeiten so dass im Notfall der Hauptcomputer vom Backup-SRI mit einer Zeitverzögerung im Millisekundenbereich Daten erhalten kann.

Das vom SRI2 gelieferte Fehlwertmuster wurde vom OCS Hauptcomputer angenommen und ungeprüft verarbeitet. OCS führte wie befohlen aufgrund der Werte Richtungsänderungen durch wobei die Korrekturen die strukturelle Integrität der Rakete überlastete. Das Raumfahrzeug brach auseinander. Eigentlich wurde es voher von Sicherheitssystemen an Board zur Explosion gebracht bzw. wäre von der Bodenstation ausgehend gesprengt worden.

thomas-zehrer-de_ariane5-serie

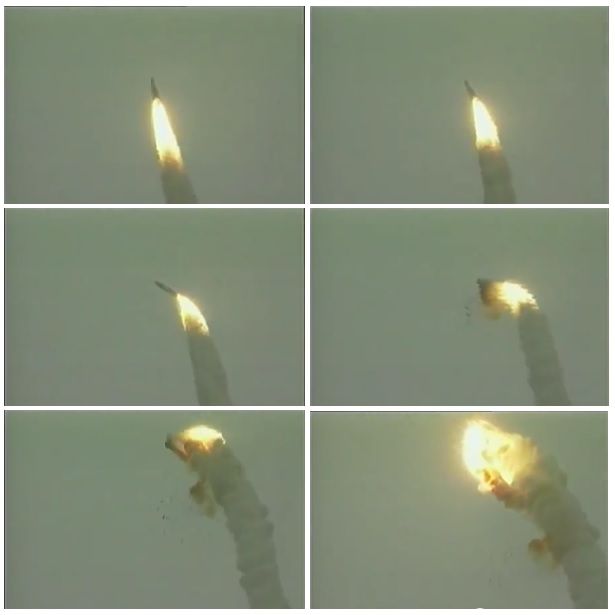
Abb: Serie von Sek. 38 bis 44 nach Liftoff

An der obigen Bilderserie ist gut zu erkennen, dass es vor der Explosion einen Richtungswechsel gegeben hat, der eine Detonation zur Folge hatte.

Wie könnte man einen solchen Fehler verhindern?

In heutiger Zeit wendet man beispielsweise für binäre Programmmodule – Software, für die also der Quellcode nicht zur Verfügung steht – sogenannte Blackbox-Tests an.

Bei Black-Box-Tests stellt man sich zu Beginn anhand sog. Äquivalenzklassen einen Satz mit Testwerten zusammen. Verlangt eine Eingabe (könnte auch der Parameter einer Funktion bzw. über eine Sensorenphalanx geschehen) einen Zahlenwert, der nicht kleiner als 0 aber auch nicht größer als 100 ist, so wäre diese Variable zu definieren mit var < 0 < 100.  Dann definiert man einen Gut- und einen Schlechtwert. Ein Schlechtwert wäre hier -1 und ein Gutwert kann man als 51 definieren. Die Funktion oder die Eingabe wird nun mit diesen Werten getestet. Gibt es eine Vielzahl Eingabeparameter, so muss eigentlich eine jede Kombination getestet werden. Bei einem Eingabewert wäre das 2 (1 Gutwert und ein Schlechtwert). Bei zwei Eingabewerten wären es schon 2^2 und bei 3 zu prüfenden Werten wären es 2^3 = 8 Werte.  Wieder unter Annahme, es handle sich um 10 zu prüfende Zahlewerten mit jeweils einem Gut- und einem Schlechtwert, dann wären 2^10 = 1024 Möglichkeiten zu prüfen.  Im technischen Umfeld Maschinen- oder Anlagenbau sowie in der Elektrotechnik gibt es oft eine Vielzahl von Parametern. Dann sollte von der Testperson das Ergebnis interpretiert werden können.  Alles nicht so einfach.

Vorhandener Quellcode – also sog. Whiteboxes – kann dagegen mit Whitebox-Testverfahren getestet werden.

Dabei kann der Quellcode generellen Analysen unterzogen werden: z.B. mit der sog. „zyklomatischen Zahl“.  Der Code wird zunächst als sog. Programmablaufgraph abgebildet. Alle Kanten, d.h. alle if-else- und Schleifen-Anweisungen werden gezählt, genau so die Kanten von Anweisung zu Anweisung. Eine if-else ist eine Kante. Eine Schleife ist ebenso eine Kante. Ein Knoten kann eine Anweisung sein. Dann wird die Zahl berechnet mit Z = e – n  + 2.  Wobei: e = edges und n = nodes.

Beispiel anhand eines 5-Zeilers:

thomas-zehrer-de_programmablaufgraph

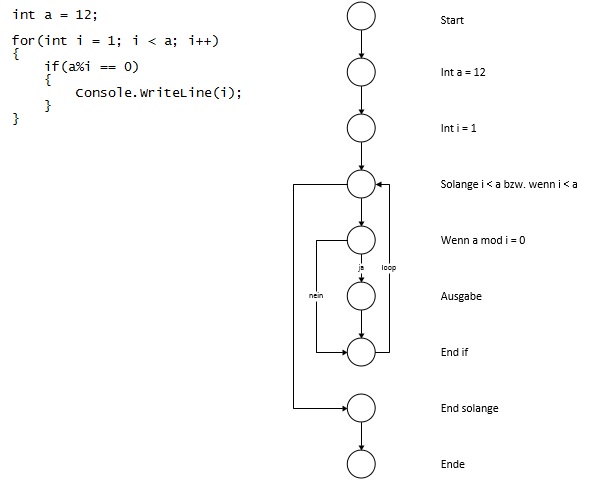
 Abb: Code und der Programmablaufgraph

Obiges Beispiel hat 10 Kanten und 9 Knoten (Start und Stop mit gezählt).  Die zyklomatische Zahl lautet hier: 10 – 9 + 2 = 3. Man liest: die Zahl sollte den Wert 10 nicht überschreiten.

Ist der Programmablaufgraph erstellt, kann anhand daran der Quellcode nachvollzogen werden und zwar mit mehreren verschiedenen Verfahren:

Anweisungsüberdeckende Tests, d.h. der Test sollte alle Konten abdecken. Im obigen Fall wäre das Testmenge i= 2 oder 3.

Zweigüberdeckende Tests, d.h. alle Kanten/Zweige sollten mind. 1 mal durchlaufen werden. Oben wären das bei Testmenge  i = 3 und 5;

Dann gibt es noch den pfadüberdeckenden Test, bei denen alle Prüfungen mind. 1x erfolgreich und 1x nicht erfolgreich sein sollen. Schleifen sollen zudem komplett durchlaufen werden. Die Testsätze vermehren sich entsprechend.

Abschließend ist wichtig zu wissen: Quellcode soll gut dokumentiert werden. Die Funktionsparameter sollen in Funktionsköpfen dokumentiert werden ebenso was die Funktion genau macht mit einem entsprechenden Rückgabewert.

Die Aussage „ich bin gleich fertig – ich muss nur noch Testen“ darf es so nicht geben. Ein Verhältnis Entwicklung/Test von 50/50 oder 60/40 ist nicht außergewöhnlich.

In der Flug- und Raumfahrttechnik gibt es bspw. Levels, die anhand Konsequenzen festgelegt werden: katastrophal (Level A), gefährlich/schwerwiegend (Level B), erheblich (Level C) und geringfügig (Level D) und unbedeutend (Level E).  Nach Standard DO-178B muss eine 100%-iger Überdeckungsnachweis anhand obiger drei Testverfahren gebracht werden.

Ob das auch eine Übernahme von funktionierendem Code aus alten Systemen einschließt?  „Normal scho…“